Saturday, September 15, 2012

Pulpit Update

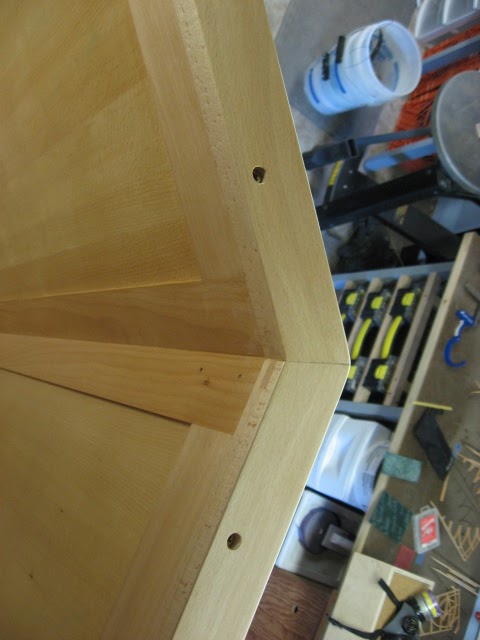
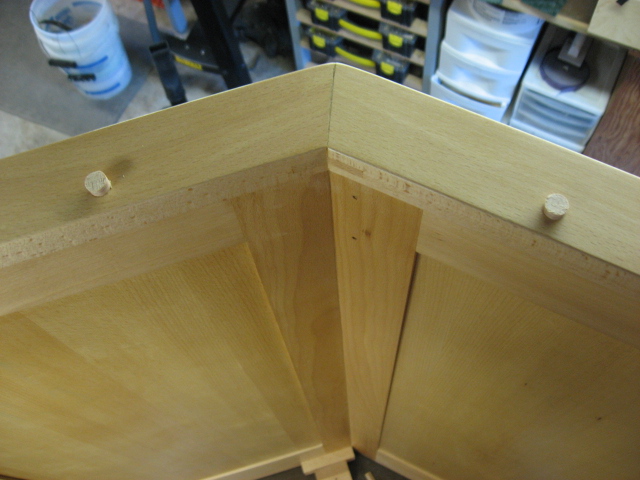
This project is getting closer to being completed.  I had some issues with the paste wax smudging and streaking and not leaving a consistent sheen so I bagged it.  I had to strip some wax off and reapply some coats of poly.  I have one, maybe two more coats to apply to the front and then install the corner details and trim and some touch up on the finish after those are installed. 

The arches are permanently attached.  The miters took a little finessing to look good but that is to be expected.  I am pleased with how well they look now. 


The internal frame with the shelves and drawer are attached now too!  I have the holes plugged and the glue is drying.  I will have to flush and sand them and apply some poly over them. 


The rail for the slanted top to rest on is on now too.  I also blued the steel "hooks" that will hook on the rail and they are screwed to the underside of the top.  The hooks will allow the top to lift up for access to the drawer or to get something that my have slipped under the top.  The top is not pictured on yet, the finish on the top shelf needs to cure longer, it is still soft.


That is all for now.  More to be updated soon.  My hope is to have it in the church in the next couple of weeks but I have said that too many time before and it hasn't happened yet.  We will see.


Saturday, August 25, 2012

Bandsaw Dust Collection

As I continue to make more projects out of wood, I find that I rely on my bandsaw for more and more of them.  The bandsaw is great for cutting curves, resawing wood and for cutting blanks for woodturning.  The bandsaw is very versitile and comes in useful for many projects but it does have one major drawback, SAWDUST! 

The bandsaw makes LOTS of sawdust.  Not only does it make a lot of dust, it throws it around too!  A majority of the dust settles in the lower wheel housing and stays there.  As the dust fills the housing, more dust gets stirred up by the lower wheel spokes that are spinning around like fan blades.  Where the blade channels through a blade guard going to the upper wheel is the spot where the dust really gets airborne.  If it's in the air, then we breathe it usless we have some way to filter it.  But even if we don't breathe it by wearing a respirator the dust still gets all over the shop. 

The best way to help solve both of these problems is the capture the dust where it is being made rather than in our lungs or, all over that still wet finish on our masterpiece project. 

My bandsaw is a Delta 14" saw and the only design of any dust collection is a very small port located just below the blade where a vacuum could be attached.  The volume of air that this small port could collect isn't enough to keep up with the amount of sawdust that the saw can produce. I had to do something to help keep the dust down, it was just getting to be a chore to keep the dust mess to a resonable level in the shop. 

What I have here is the beginning of my process for adding some adequete dust collection to my bandsaw.

This is getting wordy so I will let the pictures do most of the talking.

 Here is the saw with the pulley and guard removed to have access to position, mark and cut a hole for a 4" dust collection fitting.  I marked it with a Sharpie marker.
Here are the markings for the 4" hole and the four holes where I drilled and tapped to hold the plastic dust collection fitting.
I wasn't really sure how I was going to cut a 4" hole in the cast iron so I started to drill the perimeter of the hole and found out that I didn't really want to do that for the whole thing.  Next I used a jigsaw with a metal blade and that worked for a while until I toasted the only metal cutting blade that I had.

Next I moved on to using a metal cutting hacksaw blade and handsawing it.  Yeah, right!  That lasted only a few minutes until I figured at the rate I was cutting the cast iron, I wouldn't get done until Chritsmas! 

I moved on to breaking the hacksaw blades in half and using them in a sawzall or recipricating demo saw.  That worked well but I did burn up few blades doing it like that and it was tough to cut the curve so I ended up having to drill out some more holes on the right side across from where these holes are located. 
Here it is all cut out.  I did take a dremel tool with a grinding bit in it and smoothed the circle out better than in the photo and to take the sharp edges off of the hole. 


The fitting installed.
The pulley, belt and guard installed and ready to go.  You can see the small dust port under the table on the left sticking out (black).  I bought a 2.5" port for that and next will be to figure out how to get that on there and working. 

I haven't tried the dust collection with the new 4" port installed yet but I hope to get some time to soon.

I also want to say "Thanks Dad" for the 2nd bandsaw!  The one on the right is a saw that I got from my Dad.  Now I can have one set up for resawing and the other one for curves.  What a life of luxury!

If the dust collection works well on this saw, I will do the same to the 2nd one.


Saturday, August 4, 2012

It has been awhile since

I have shared any progress on the pulpit that I started about a year and a half ago.  This is probably my second largest woodworking project since I started considering myself a woodworker.  My largest project was a set of bunkbeds that I made for the boys about 7-8 years ago.  This is the first project of it size that I completely designed the construction of.  I only had a few pictures and measurements from another pulpit. 

Figuring out how to do it and what details to add was the more fun part of the project.  Breaking down the rough lumber and dimensioning it is fun too.  When I got into the detailed construction of it, I got bogged down and sort let my interests wander.  I just seemed to procrastinate on getting out in the shop and working on it.  I wasn't avoiding the shop, just this project. 

It's an exciting project but I lose steam fast.  I have come to realize that I would prefer building smaller projects since I have been working on this one.  Now I am to the finishing stage and I am getting more and more excited about seeing this project through to completion.  I like how the finish is going but I am realizing that I needed to spend more time actually sanding the surfaces before I got to this point.  Another lesson learned.  It's not bad, just not as nice as I thought that it was. 

Most people will never know but I will.  I have to remember that I am not perfect and some of the "flaws" in a project can add that human element to it.   

Here are some pictures of how it sits now. 


There are two coats of poly on the front, one on the back, one on the inside frame to the left of both pictures and one or two coats on some of the other smaller parts that are in the picture.  I just screwed the top lip on the five panels and glued the plugs in.  I will cut the excess off and flush it with the lip and degloss the finish in preparation for more poly.


Here is a picture showing the sheen of the finish on the front.  This has been deglossed with a green scotchbrite pad.  I think I could just wax and polish this surface and it would come with just the right satin sheen that I want.  I think I will add one more coat for good measure!


Tuesday, July 31, 2012

We live in an older home. With that comes some need of making home repairs and improvements. Our house has some nice single panel fir doors but they have been coated with many layers of paint through the years.

Quite some time ago, I got the urge to see what treasure lay beneath the layers of paint on one of the doors. This was a test to see if I wanted to reveal the wood on all the doors in the house. This task proved to be a real chore and not one that I thought was of enough value to put all that effort into. Removing multiple layers of paint is WORK!

So I ended up with one stripped door that needed to have something done with. This one ended up getting hung back up and nothing done to it for a couple of years until now. We had the plan to paint this image on it but the desire or the time to get to it seemed to keep dodging us. Finally with the birth of a new boy, I had a couple of weeks off to spend helping with the other kids and taking care of household chores. We got excited about painting our door and this is what we ended up with.


We also made a video of the process and we think it turned out fun!
Now we need to come up with a picture idea for the back of the door!


Monday, July 30, 2012

Woodworking is not only fun, but practical.

Our towel bar, that was mounted to the wall with those plastic drywall screw type thingies, finally worked itself free on one side, looking like an old jalopy car with broken suspension springs. The one side was hanging on for dear life while the sinister single towel that hung upon it, was trying to bring it down to its demise.
Well, before the bar came down to its certain death, I decided that something needed to be done before this happened. So I finally got around to making a towel bar with a shelf. Or is it the other way around? A shelf with a towel bar?

Either way, this is it!


It’s made from some 1” cedar decking that I had left over that I used for a small section of fence to divide an area in the yard. I no longer needed the fence where it was and took the section down and stored it outdoors under cover.

When I came up with a design, which took about 3 minutes on the internet, I went into action Faaaaaast!

This was about a 3 hour project fron start to finish this Sunday afternoon. It is contructed with glue and nails. No fancy schmany joinery here! In fact, no finish either! Just the raw wood.

This isn't the only wood thing that I have been doing. 

Here is a goblet that I made for Sean, our newest member of the family.


This is a video of the making of this goblet.  I hope that you enjoy it.


Here we are after a hard days work!  Ha ha.


Monday, July 23, 2012

A New Arrival!

No, no, no, I know what you were thinking...  a new TOOL! 

No, this is NOT about a new tool, however nice that is but, this is about a new BABY!

Yes, we are blessed to have a new baby boy in our home! 

Sean joined us on July 22nd.  Of course he was an instant HIT with all of us!


Now for those of you that were looking for something woodworking related, here is a video of making a rattle for Sean the evening before he was born.


Wednesday, July 18, 2012

Pencil Tips

Here are a quick series of 3 videos for tips on shop pencils.

This is a very lengthy and diverse subject but I think that I was able to condense the important topics down so that even the uninitiated will comprehend it.

The video series should be watched in order from the top down for the most sequential presentation of this confusing subject. 

Put your thinking caps on!