Building a
Bookself for the
Boys!
We started to try and organize the little boys room a while back. It has been a process!
Three boys in one bedroom, 6 years old and under, creates a challenge just keeping toys and books picked up. This next project in the ongoing task of organizing is a bookshelf. A very much needed bookshelf!
This sort of jumped ahead in my wood project planning for this year. That's OK though, it is one of those immediate attention things that needs to be taken care of. It has been put off for too long!
The construction is pretty simple, plywood carcass trimmed out to look like it was built with more traditional methods. I used a lot of pocket hole (KREG) joinery in this.
The shelf will look like a free standing bookcase except no feet in the back. It will rest up against the wall and will be secured to the wall with screws. I will leave the back open and the painted wall will be the back of the cabinet. I chose to do it this way to save material and time.
I used the hand-held circular saw and a homemade guide to cut the 3/4" thick material to width. The pieces were cut to length with the sled on the table saw. The sides, top, bottom and three shelves were cut this way. The dimensions were figured by measuring the space where the shelf will be installed. It has to fit with in two doorways and below some chair rail trim on the wall.

Four sides and the long piece for the shelves. I didn't cut the shelves until I had assembled the carcass pieces so I could get a precise measurement. It was basically the width of the top or bottom pieces minus 1/8".

I used the can for the radius for the leg cutout.

Here it is cut out with a jigsaw.

Pocket holes drilled in the top and bottom. The hole will be located on the outside of the carcass. The top holes will be covered by a laminated wood top and the bottom will be on the bottom of the case and they won't be visible unless you get on the floor and look underneath.

Four sides assembled to make the case.

Used a Rockler Shelf Pin Jig to drill the holes for adjustable shelving.

Laminated top all glued and clamped together. I used 2x4 material for the top and trim pieces. This project used about 2/3 of a sheet of 3/4" thick poplar plywood ($45) and about 3 8' 2x4s ($8). I will use some paint and polycrylic finish to add color and protection. I bought a 1 qt paint sample from Miller Paint Co. for $5 and the 1 gal. Minwax Polycrylic I had purchased for a previous project. It was around $40. If you total everything that's $98. The leftover paint, finish and plywood will be used for other projects so all of the costs shouldn't be totaled into this one project. But still, for a custom bookcase, $100 isn't too bad.

Some of the leg detail with trim on the bottom and faces.

The bottom front trim piece cut.

With the side trim piece fit.

Pictured here with the face frame in place.

I had a couple of Opps in the project so far. Both were from using the pocket hole screws. This is one of them. The leg front it attached to the side leg piece with pocket holes. I chamfered the corner of the leg to soften the edge and add some detail. When I drove the screws in, the tips just barely came through. I backed them out and ground the tips off with a bench grinder and drove them back in.

The other Opps was attaching the front trim piece to the bottom of the case. I got the screw started crooked in the pocket hole and it drove through and came out the edge of the trim piece. You can see the small broken piece of wood there along the seam between the two. Not a huge deal and it won't even be notices once finished and in place filled with books.

Just showing off some of the pocket holes and how they were located to join the pieces.

The join between the front and side of the legs.
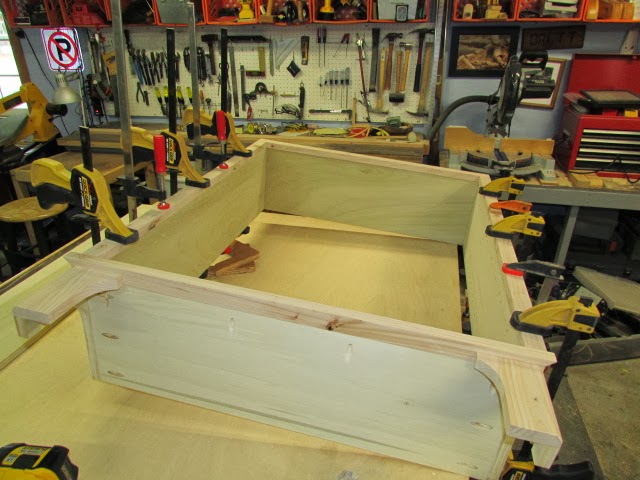
Face frame glued and clamped in place.

I thought that case looked a bit plain so I cut a thin piece to form and arch on the top of the case with open corners.

I found a nice straight grained 2x4 and resawed that on the table saw to make the trim for the side panels. They are glued and clamped in place.

Here is what the joints look like close up. I am very pleased with how it looks!

These are pieces that are glued to look like a frame and panel side.

Three shelves with edging attached with pocket holes.

From the side.

This is the inside of the case along the top. It's a 3/4" thick piece of plywood secured to the top and the sides. I will screw through this strip into the studs in the wall to secure the bookcase.

Sides with trim glued on to look like a frame and panel.

Leg and corner details.

Arch and top corner details.

Top arch.

Overall look. I still have some sanding to do and I think I may do bread board ends on the top to cover the end grain. The top overhang will get cut back some and I may chamfer the bottom edge of the top.
Next will be painting and finishing the bookcase. I need to do some testing first before I proceed on the finished piece.

No comments:
Post a Comment